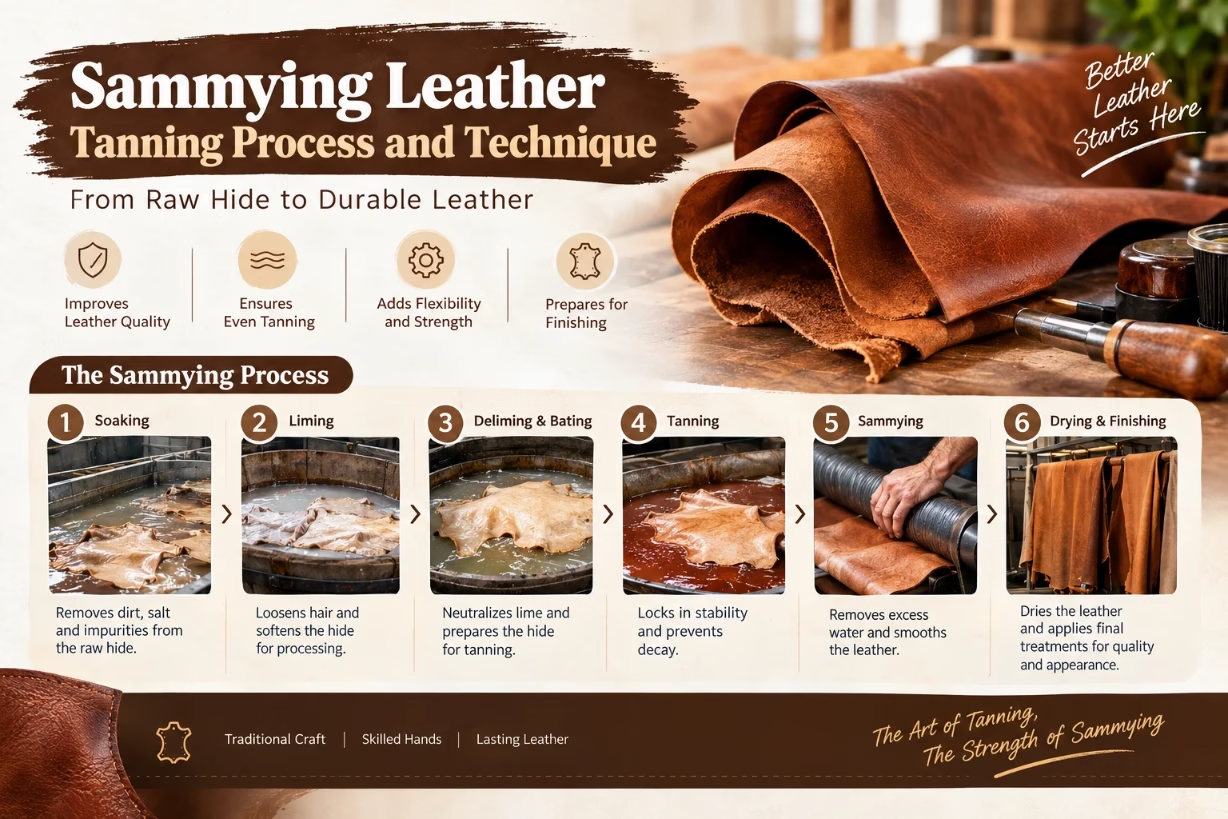
Sammying in leather tanning is the step where wet hides are gently squeezed to remove water and spread fibers, giving the leather the right moisture, thickness, and feel for later processes like splitting, shaving, and finishing.
When I talk about the sammying leather tanning process and technique, I am really talking about the quiet middle stage of leather making that most people never see. The flashy parts are dyeing, finishing, and talking about full grain or top grain. But without careful sammying, none of those later steps go smoothly, and the leather never feels quite right in the hand.
What sammying actually means in leather tanning
Sammying is the controlled mechanical squeezing of wet tanned hides or skins to remove excess water and start flattening and opening the fiber structure. It usually happens right after tanning and before splitting, shaving, and drying. In simple words, sammying takes dripping wet leather and brings it to a steady, usable dampness.
In a normal tannery flow, the hide goes through soaking, liming, fleshing, deliming, bating, pickling, tanning, then sammying. By the time the hide reaches the sammying machine, it holds a lot of water trapped between and inside the fibers. If that water stays there, the hide is very heavy, hard to handle, and tricky to process without defects.
So the main goals of sammying are:
- Reduce moisture to a controlled level, usually around 55 to 70 percent.
- Flatten and stretch the hide evenly to prepare for splitting and shaving.
- Improve chemical penetration for later retanning, dyeing, and fatliquoring.
- Cut down drying time, saving both energy and labor.
When sammying is done well, leather looks more open and flat, not wrinkled like a wet sheet of paper. When it is done badly, you see crush marks, uneven thickness, and weak spots that may tear in later machines.
Where sammying fits in the full leather process
To really understand sammying, I like to zoom out and walk through the wider journey of a hide. A raw hide starts as a byproduct of the meat industry. It is preserved with salt, then rehydrated in soaking drums. After that, the liming step opens the fibers and removes hair and some flesh. Then come deliming and bating to soften and clean. Pickling drops the pH to prepare the hide to take up tannins or chrome.
Once the tanning step is complete, the hide is now technically leather, but it is still extremely wet and heavy. This is the moment when sammying steps in. Instead of hanging these soaked hides to drain, tanners pass them through a sammying machine. After sammying, the hides are easier to move, stack, and process. They can go to splitting machines that slice them into grain and flesh layers, and to shaving machines that fine-tune thickness.
If you think of leather making as building a house, tanning is the foundation, but sammying is the act of leveling the ground and drying the base so you can safely build the walls. Skip careful sammying, and every later step becomes a fight against uneven moisture and badly opened fibers.
How a sammying machine works in practice
Most sammying machines use a series of heavy rollers covered in rubber or felt. The wet leather is fed between these rollers, usually supported by a moving felt belt. The machine squeezes out water while protecting the grain surface from harsh contact with metal. The felt also helps pull moisture away so it does not just move from one area back to another.
Key parts of a sammying machine and their role:
- Feed system that guides the hide into the nip between rollers without folding.
- Pressure rollers that squeeze water out with adjustable pressure.
- Felt or synthetic belts that carry and absorb or transport the released water.
- Drive and speed controls to set how fast the hide passes through.
- Safety bars and guards to protect workers from getting pulled in.
The heart of sammying is the balance between pressure and speed. Too much pressure and the grain can crush or crack. Too little and water stays inside, leading to slow drying and uneven results. Too fast and the water does not have time to escape. Too slow and you overload the machine, wasting time and risking marks on the leather.
Step by step: the sammying process on the shop floor
When I break down practical sammying for someone new to leather, I usually describe it in simple stages. Even though every tannery adjusts steps to its own system, the core sequence is fairly consistent.
1. Receiving wet tanned leather
Fresh from the tanning drum, hides are stacked or draped, often still dripping. At this point:
- Moisture content is very high, often above 70 to 80 percent.
- The collagen fiber network is swollen and flexible.
- The surface is slick, and folds stick together easily.
Workers or handling equipment bring these wet hides to the sammying line. If hides are folded badly or stuck together, they may be gently separated so they feed smoothly.
2. Positioning and feeding the hide
The first contact with the machine can decide whether marks show up later. Skilled workers feed the hide carefully, making sure it lies open, not twisted. The grain side usually faces the felt or softer side of the system to keep fine surface details safe.
Many tanners adjust machine settings for the type of leather they are working on. Thick cow hide for upholstery will need different sammying pressure than thin goat skin for gloves. I have seen good operators keep a small notebook of preferred settings for each article they run.
3. Actual squeezing and moisture reduction
As the hide passes between sammying rollers, water is forced out and carried away. The goal is not to dry the leather fully, but to bring it to a steady, repeatable moisture level that fits the next step. If moisture stays too high, splitting blades struggle, shaving machines clog, and dye take-up becomes random.
Many plants check moisture by weighing test pieces or using simple moisture meters. Some rely on experience; you can feel when a hide is “right” for splitting, slightly cool and damp but no longer dripping or squishy.
4. Flattening and partial stretching
Besides water removal, the pressure and movement in sammying help flatten wrinkles and open up the fiber structure. This mild mechanical action is different from full stretching, but it sets the base for later toggling or vacuum drying steps.
If you picture squeezing a sponge flat between your hands, you get the general idea. You are not just getting water out, you are shaping the sponge. In leather, that shaping affects grain tightness, softness, and final yield.
5. Stacking and resting after sammying
After sammying, hides are usually stacked on pallets or hung for a short resting period. This resting stage lets moisture distribute more evenly through the thickness. Sometimes you might see darker edges and lighter centers right after sammying. A bit of rest time helps balance that out so the leather behaves more predictably in splitting and shaving.
Key technique choices that define good sammying
Perfect sammying does not come from a machine alone. It depends on decisions and habits, the small choices that experienced tanners make during each run.
Setting proper pressure and nip width
Pressure is the main lever in sammying. Too much pressure on grain leathers can flatten the pores and give a lifeless look. It can also cause internal shear in the fiber network, leading to weak areas. Too little pressure and the leather leaves the machine feeling like a soaked towel.
Good practice usually means:
- Higher pressure for thicker, firmer hides like heavy cow.
- Gentler pressure for delicate skins like lamb, calf, or goat.
- Fine adjustment as hides move from wet blue or wet white into lighter weight segments after splitting.
Controlling speed during sammying
Line speed decides how long each part of the hide spends under pressure. When I watch a machine, I think of speed like a tempo in music. Faster tempo gets more done but leaves less time for each beat. For sammying, too fast means water does not escape properly and leather can spring back with trapped moisture. Too slow can cause overload, belt wear, and pointless bottlenecks.
Most tanneries set a normal operating range, then adjust inside that window based on hide thickness, size, and wetness. Skillful operators also change speed if they start to see marks, folds, or uneven moisture along the length of the hide.
Protecting the grain surface
The beauty of finished leather depends heavily on how the grain faces every machine in the tannery. In the sammying stage, protection tools include:
- Soft felt or fabric belts against grain.
- Clean rollers without sharp residues or dried chemicals.
- Correct feeding so wrinkles do not get pressed hard into the surface.
A common problem in bad sammying is “crush grain” where the surface looks slightly burned or overly flat. Once you see that damage, no amount of finishing tricks truly brings back the original character. This is why I treat grain care during sammying as non‑negotiable.
How sammying affects quality and yield down the line
Too many people look at sammying as a simple dewatering step, like using a big towel. In reality, it shapes many hidden aspects of performance. When you hold a leather bag years later, you can still feel echoes of how that leather was handled at the wet blue stage, including the sammying decisions.
Impact on thickness and splitting accuracy
Well sammyed leather feeds more consistently into splitting machines. If the moisture is even, the splitting blade meets uniform resistance. This means the split side and grain side end up with steady thickness across the hide. Uneven sammying, on the other hand, creates zones that compress more or less under the blade, leading to wavy thickness and more waste.
Influence on softness and feel
Sammying gently opens the fiber bundle without tearing it. When the pressure and speed are just right, later mechanical actions like staking and milling can bring out softness without breaking grain. If fibers are crushed early, the leather may feel boardy no matter how much softening you do afterward.
Effect on drying and energy use
Removing more free water at the sammying stage means less work for drying tunnels, vacuum dryers, or hanging rooms. Since dryers consume energy and time, smart sammying can cut running costs. At the same time, you do not want leather too dry too soon. Moderate moisture is vital for even retanning and dyeing. That balance is one reason why experienced operators are still valuable, even with smart controls.
Common sammying defects and how to avoid them
No technique is perfect, and sammying has its own typical defects. I will go through a few that show up often and what usually causes them.
Crush marks and flattened grain
These look like shiny, hard patches where the grain has lost its natural break. Main causes are:
- Too much nip pressure, especially on thinner leathers.
- Dirty or uneven rollers creating hot spots of force.
- Feeding folds into the machine so one layer presses heavily on another.
To prevent this, I focus on pressure tuning, regular cleaning, and patient feeding, even when production is in a hurry.
Creases and permanent wrinkles
When a fold or wrinkle goes through sammying, it tends to set into the leather. Later stretching or staking might reduce it but rarely erases it fully. Creases come from poor laying of hides, rushing the feeding, or not smoothing edges and bellies as they enter the nip.
Uneven moisture across the hide
Sometimes the center of the hide remains wetter than the edges, or one side feels noticeably damper. Causes often include:
- Unequal pressure along the roller width.
- Worn felt that no longer gives even contact.
- Too fast speed for very heavy or thick hides.
Regular maintenance and calibration are key. I also find that combining sammying with a short rest period helps moisture even out naturally before critical machining steps.
Different types of sammying equipment
Even though the basic idea stays the same, sammying machines come in several styles that fit different plant sizes and leather types.
Single‑station sammying machines
These are common in smaller tanneries. A single nip zone gives one strong pass. Operators may sometimes send hides through twice if they need more moisture removal. These machines are simpler and easier to maintain but can be slower for high volume work.
Multi‑roller and combination sammying units
Larger plants often use machines with multiple roller stages. Each stage can run at different pressures, giving a gentle first squeeze followed by firmer pressing. Some units combine sammying with setting out or partial stretching, saving floor space and handling steps.
Automatic and sensor‑guided sammying
Modern systems may link sammying to moisture sensors, pressure monitoring, and recipe control. Once you define a target for a certain leather article, the machine can repeat that recipe with less manual adjustment. Even with automation, though, I believe human attention still matters. Sensors can drift, but a trained hand feeling a hide coming off the belt can sense trouble faster than a graph on a screen.
Good sammying practice for clean, consistent leather
Sammying is one of those steps where discipline pays off. A few habits make a real difference in everyday work.
Keep machines clean and felt in good condition
Dried chemicals, sludge, or tiny hard bits on rollers or belts can mark thousand‑dollar hides in seconds. Changing felt at the right time, not too late, also protects grain and maintains even pressure. I like to think of the felt as a soft glove that the machine uses to hold the leather. A torn or dirty glove will always leave traces.
Match sammying settings to the final product
If the final leather is meant for soft nappa garments, sammying should favor gentle handling, controlled moisture, and strong grain preservation. For robust leather like belts or soles, higher pressure and more moisture removal are often acceptable. Thinking backward from the finished product helps set the right compromises at this mid stage.
Train operators to read the leather
Any guide about sammying that ignores human skill feels incomplete to me. Machines do what they are told, but operators notice when something feels off. Encouraging people to check hides with their hands, eyes, and simple moisture checks builds a feedback loop. Over time, this leads to fewer surprises in splitting, drying, and finishing.
Why sammying matters even if you never see it
If you work in design, sourcing, or leather goods, you might never stand next to a sammying machine. Still, choices made at this point touch everything you handle later. A consistent batch of leather, with steady color, thickness, and feel, almost always points back to disciplined wet blue handling and solid sammying technique.
When you read technical sheets that promise certain softness or tear strength, remember that these numbers rest on many earlier quiet steps. Sammying is one of them. It is not flashy, but it carries real weight in how leather behaves when cut, stitched, and worn for years.
So when people ask why some leathers age with grace and others crack or feel harsh, I look beyond the final topcoat and go right back to the wet side of the tannery. Proper sammying is part of the reason some hides become trusted partners in products, while others never quite feel at home in the hand.
Final thoughts on mastering the sammying stage
In the bigger picture of leather manufacture, sammying sits between chemical science and mechanical skill. It follows the complex reactions of tanning and prepares the hide for precise cutting, thinning, and color work. Done well, sammying gives leather a calm, ready state, with balanced moisture, opened fibers, and protected grain.
Whenever I walk a tannery floor, I pay close attention to this quiet machine in the wet blue zone. The rhythm of hides going in heavy and coming out lighter tells me a lot about how the rest of the process will go. Strong leather often starts from small but careful decisions here, where sammying shapes the hidden backbone of quality long before you ever see a polished shoe, a bag, or a jacket on the shelf.