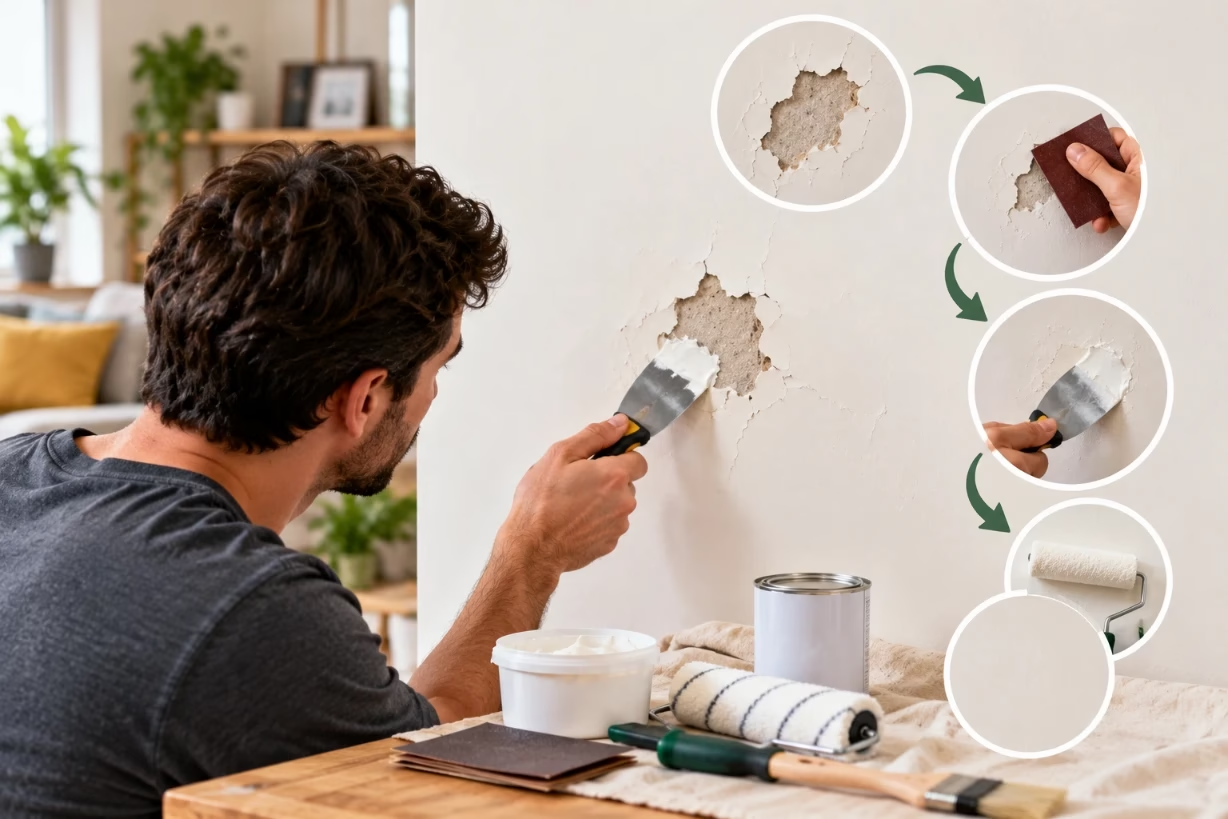
If you want to know how to repair chipped paint on a wall, you clean the area, scrape loose paint, patch and sand the chip, prime the spot, then repaint with thin coats that blend into the rest of the wall.
When I first learned how to repair chipped paint on walls, I was surprised by how much difference a small chip can make in a room. That tiny missing patch of color keeps catching your eye every time you walk past. The good news is that fixing it is not hard at all, as long as you follow the right steps in the right order. In this guide, I will walk you through every part of the process so you can repair chipped paint with confidence, even if you have never done any wall repair before.
Why chipped paint shows up so much on a wall
A chipped paint wall almost always looks worse than it really is. Your eye is drawn to sharp edges and strong contrast. A soft, smooth wall suddenly has a broken line, a darker spot, or rough texture. That is why how to repair chipped paint is such a common search for homeowners, renters, and even people getting ready to sell a place.
Chips usually show up in a few classic spots: around door frames, near light switches, along baseboards, and wherever furniture bumps into the wall. Sometimes the chip is only in the top color coat. Other times it cuts all the way down to bare drywall or plaster. Knowing how deep the damage goes helps you decide how to repair chipped paint the right way instead of just hiding it for a week or two.
Common causes of chipped paint on walls
Before I get into the fixing steps, I like to look at why the paint chipped in the first place. If you understand the cause, you can often prevent the same problem from coming back in the same spot.
Everyday bumps and scrapes
The most common reason for a chipped paint wall is simple impact. A chair hits the wall, kids toss toys, door handles slam, or you move a piece of furniture a little too fast. The paint film is hard but thin, so it cracks or chips when something sharp hits it.
Moisture and humidity issues
Bathrooms, kitchens, and laundry rooms are frequent trouble spots. If the wall soaks up moisture again and again, the paint can lose its grip. In those rooms, when I decide how to repair chipped paint, I almost always check for peeling, bubbling, or soft drywall too. That can mean you need more than just a cosmetic touch up.
Poor surface prep from older paint jobs
Sometimes the problem started years ago. Maybe the old painter did not clean the wall well, painted over glossy paint without sanding, or skipped primer on bare drywall or patched spots. In that case, chips can spread easily, and every little bump breaks off a larger flake. When I see paint peeling off in big pieces, I know the real fix will be more involved than a quick dab of paint.
Wrong kind of paint or primer
Paint that is too brittle or the wrong type for the room can also lead to chipping. For example, a cheap flat paint in a high-traffic hallway can mark and chip easily. Also, painting latex over old oil paint without proper prep often leads to chipping, because the new coat never bonds well to the old one.
Tools and materials you need to repair chipped paint
To follow these chipped paint wall fixing steps, you do not need fancy tools. You likely already own most of them. Here is the basic list I rely on when I show someone how to repair chipped paint at home:
- Painter’s tape
- Drop cloth or old sheet
- Small scraper or putty knife
- Medium and fine grit sandpaper (around 120 and 220)
- Spackle or lightweight wall joint compound
- Primer (ideally stain blocking or bonding primer)
- Touch up paint that matches your wall color
- Small paintbrush or foam brush; mini roller for larger areas
- Clean cloths or paper towels
- Mild cleaner or wall cleaning wipes
Having everything on hand before you start makes the job smoother. You will also feel more relaxed, because you know you can move from one step to the next without stopping mid-way to go buy sandpaper.
Step 1: Inspect the chipped paint wall closely
When I show people how to repair chipped paint, I always start with one simple rule: never just paint straight over the chip. Look at it carefully first. Check how big the damaged area is, and press gently around the edges of the chip with your fingernail or the tip of a scraper. If more paint peels away with very light pressure, it means the weak area is larger than it looked.
If you spot hairline cracks around the chip or tiny bubbles nearby, plan to extend the repair area a bit wider. That will help you avoid fixing the same corner again next month. This careful check only takes a minute or two, but it makes a big difference in how long your repair lasts.
Step 2: Clean the surface before any repair
Paint does not like dust, oil, or dirt. If the wall is greasy near a kitchen or has fingerprints around a light switch, the new paint will not stick well. Before doing anything else, use a mild wall cleaner or a small amount of dish soap with warm water on a soft cloth. Gently wipe the area around the chip and let it dry fully.
When I explain how to repair chipped paint to beginners, I always say that cleaning is one part people skip the most. Yet it is one of the main reasons repairs fail. Even in a clean house, walls collect invisible grime over time. A quick clean gives your patch and paint a fresh, solid surface to stick to.
Step 3: Scrape away loose paint
Now it is time to remove everything that is loose or flaking. Hold a small scraper or putty knife flat against the wall and gently slide it under the edges of the chip. Do not dig deep into the drywall; your goal is to lift only paint that is not strongly attached.
If the paint keeps flaking outward, keep scraping until you reach firm edges that do not break off when nudged. On some walls, this might grow from a tiny chip to a wider patch, which can feel annoying in the moment. I understand that feeling, but this is exactly how to repair chipped paint in a way that will not fail again soon. Better to fix a slightly larger area once than repeat tiny fixes many times.
Step 4: Sand the chipped area smooth
Once the loose paint is gone, you are left with a shallow crater where the layers of old paint broke off. If you run your fingers across it, you will feel a sharp ridge where the intact paint meets the exposed surface. The goal of sanding is to soften that ridge so the repaired spot disappears after painting.
Start with medium grit sandpaper, such as 120. Sand lightly around and over the chip, feathering outward a couple inches in every direction. Think of it like gently blending the edge of a sticker into the wall. After the ridge feels less sharp, switch to fine grit sandpaper around 220 and smooth everything out.
Wipe away dust with a clean, slightly damp cloth and let the area dry. At this stage, the chip should look less harsh. The smoother you get it now, the easier it will be to make the repair invisible when you paint.
Step 5: Fill the chip with spackle or joint compound
For most interior drywall repairs, I use a lightweight spackle that dries fast and sands easily. This is the key part of how to repair chipped paint when the damage goes down to the drywall or leaves a noticeable depression.
Use your putty knife to scoop up a small amount of spackle. Press it into the chipped area and draw the knife across the surface at a slight angle, smoothing the filler flat. Try not to leave big ridges, but do not stress if it is not perfect. The goal for the first coat is to fill the deepest part of the chip.
Let it dry according to the product label. Once dry, lightly sand with fine grit sandpaper until the patch feels level with the surrounding wall. If you feel any low spots, repeat with a second thin layer of spackle. Several thin layers work better than one thick glob, both for strength and for looks.
Step 6: Prime the repaired area
Primer is the quiet hero when you learn how to repair chipped paint correctly. Skipping primer is one of the biggest mistakes I see. Without it, the patch can flash through your new paint, leaving a dull spot or a slightly different color even when you use the exact same wall paint.
Use a small brush or mini roller to coat the patched area with primer, extending slightly over the edges of the repair. If your original wall color is strong or dark, or if you patched down to bare drywall, I suggest two thin coats of primer. Allow it to dry fully before moving on to paint.
Primer helps your topcoat grip the surface, prevents the spackle from soaking up too much paint, and evens out the porosity of the wall. All of this helps the final finish look smooth and consistent instead of patchy.
Step 7: Touch up with matching wall paint
Now for the part most people focus on first: repainting the chip. If you still have the original paint can, check that it is the same finish (flat, eggshell, satin, semi-gloss). Shake or stir the paint thoroughly. Old paint often separates, and using it without mixing can give you a slightly off color or sheen.
If you do not have the original paint, you can take a small chip to a paint store for color matching. This extra step is worth it if the chip is in a very visible spot. When I care about a seamless look, I try hard to get as close a match as possible.
Use a high quality brush for small spots. Dip just the tip into the paint, then dab most of the extra off on the side of the can. Apply thin coats, starting in the center of the repaired area and feathering outward into the old paint. You do not want a thick ring of new paint sitting on top of the wall.
Let each coat dry fully before adding another. Two or three light coats usually blend far better than one heavy coat. Step back between coats and look at the wall from different angles, especially in natural light. That is the truth test for whether your repair has matched the rest of the wall.
How to repair chipped paint on textured walls
Textured walls add one more challenge, because a smooth patch will stand out on a bumpy surface. If your wall has orange peel, knockdown, or another light texture, you can still repair chipped paint without redoing the whole wall, but you need a couple extra steps.
After filling the chip with spackle and before priming, I like to lightly dab the wet spackle with a sponge, stiff brush, or even a rolled up paper towel to mimic the surrounding pattern. Some stores also sell spray texture in cans made to copy common wall textures. You spray a little on a piece of cardboard first to test, then lightly on the repair.
When the texture dries, sand very gently so it feels similar to the original wall, then prime and paint as usual. The closer you match the texture before painting, the easier it is to hide the repair later.
How to repair chipped paint on corners and edges
Outside corners, window edges, and trim lines tend to chip more often because they take more hits. Corners also often have metal corner beads under the paint, which can show through when chipped.
For these spots, the steps for how to repair chipped paint are almost the same: clean, scrape, sand, fill, prime, paint. The main difference is that you might need to rebuild a sharp corner shape with your spackle. I press spackle over the corner, then run my putty knife straight down each side to form a crisp ninety degree line. After it dries, I sand very carefully to keep that sharp edge.
Using painter’s tape along one side of the corner while you paint can help keep lines straight and give you a clean result. Just remember to remove the tape while the paint is still slightly wet, pulling it back on itself at an angle.
Blending larger chipped areas into the rest of the wall
If you are facing a large patch of chipped paint, maybe the size of a hand or bigger, a simple spot touch up might not blend perfectly, especially if your wall paint has faded over the years. In that case, I usually extend the repainting area to a natural break, such as a corner, door frame, or full wall section.
After you follow the basic how to repair chipped paint steps for cleaning, scraping, filling, and priming, roll paint over a wider circle around the repair. Then lightly feather the edge of the painted section using a dry roller with very little paint. This soft edge helps blend old and new paint so you are less likely to see a clear patch outline.
Sometimes, if there are many chips on one wall, it honestly makes more sense to patch them all and repaint the whole wall. It takes more time that day but usually looks better and buys you years of not worrying about matching old paint.
Preventing future paint chips on your walls
Once you have taken the time to learn how to repair chipped paint, it is worth making a few small changes to avoid seeing the same damage again soon. Here are some habits and tricks that help:
- Use door stops so handles do not slam into walls.
- Add felt pads or bumpers to furniture that sits close to walls.
- Pick a more durable paint finish like eggshell or satin in high traffic areas.
- Clean walls gently with soft cloths instead of rough pads.
- Fix small chips early before they spread into larger peeling spots.
Also, when you repaint a room, do not rush the prep. Wash the walls, fix cracks and nail holes, sand glossy areas, and always use primer on bare spots. That strong foundation is what really protects your paint from chipping and peeling in the future.
When a chipped paint wall might need a pro
Most of the time, once you know how to repair chipped paint, you can handle it yourself. But there are a few warning signs that tell me a bigger problem might be hiding behind the chip:
If the wall feels soft or crumbly under the chip, there might be water damage in the drywall. If you see brown or yellow stains, or smell a musty odor, you could have a leak or past moisture issue. In those cases, paint repair is only one part of the fix; the source of the moisture has to be found and stopped.
Another red flag is paint that peels off in large sheets with very little effort. That often means the original paint was applied over a dirty, glossy, or incompatible surface. A pro might strip or sand down much more of the wall, then rebuild a proper paint system with primer and new topcoats. If a whole room behaves this way, you might save time and frustration by calling a painter.
Final thoughts on how to repair chipped paint the right way
Learning how to repair chipped paint is one of those small skills that pays off again and again. Once you have done a couple of repairs, the steps become natural: clean, scrape, sand, fill, sand again, prime, and then paint with patience. You stop feeling annoyed every time you see a chip, because you know exactly how to fix it.
A chipped paint wall does not mean your home is falling apart. It just means life is happening on those walls. With a little care, the right materials, and some focused time, you can make those spots disappear so the room feels calm and finished again. The more calmly and carefully you move through each step, the more invisible your repair will be, and the more your walls will look like they were never damaged at all.